Category Archives: Code

How to position windows correctly at 120 DPI in WPF

If you want to place a window at a specific place in WPF, it will work pretty much as you expect—unless your DPI is 120 (the default is 96). Here’s a sample that shows how to put it where you want.

In this case, I want to put a window just under another control, aligned to its left side.


CalcWindow calc = new CalcWindow();
Point point = this.PointToScreen(
    new Point(0, this.ActualHeight));
 
PresentationSource source = 
    PresentationSource.FromVisual(control);
 
double dpiX = 
    96.0 * source.CompositionTarget.TransformToDevice.M11;
double dpiY = 
    96.0 * source.CompositionTarget.TransformToDevice.M22;
 
calc.Left = point.X * 96.0 / dpiX;
calc.Top = point.Y * 96.0 / dpiY;
 
calc.Show();

The crux of this is getting the current DPI. You could use P/Invoke to call native methods to get this, but the transformation matrix contains the same information as well.

A WPF Numeric Entry Control

image When WPF first shipped, there was a noticeable lack of certain controls we’ve become used to in Win32 and WinForms: Calendar, DateTimePicker, and NumericUpDown. WPF 4 adds Calendar and DatePicker, but not anything for numeric entry.

For my solution I wanted something that behaved very similarly to the WinForms NumericUpdown control.

Some of the specifications:

  1. Allows user to set Value, MaxValue, MinValue, Increment, and LargeIncrement.
  2. Text directly entered is limited to numbers
  3. Pasted text is not intercepted, but when the control has lost focus it will be validated and reset to the previous value if necessary
  4. Two buttons, for increment and decrement
  5. Holding down the buttons with the mouse causes the number to increment continuously
  6. Up and down increment and decrement by Interval
  7. Page Up and Page Down increment and decrement by LargeInterval
  8. This version only supports integers

Creating the control

To begin, create a new WPF project and add a new User Control called NumericEntryControl. This will create a pair of .cs and .xaml files.

In the XAML file, change the <Grid> root element to be a <DockPanel>.


<UserControl 
    x:Class="NumericEntryDemo.NumericEntryControl"
    xmlns="http://schemas.microsoft.com/winfx/2006/xaml/presentation"
    xmlns:x="http://schemas.microsoft.com/winfx/2006/xaml"
    xmlns:mc="http://schemas.openxmlformats.org/markup-compatibility/2006" 
    xmlns:d="http://schemas.microsoft.com/expression/blend/2008" 
    mc:Ignorable="d"
    xmlns:my="clr-namespace:NumericEntryDemo" Width="200" Height="26">
 
    <DockPanel>
    </DockPanel>
</UserControl>

Before we add the controls, let’s add some properties to our user control to hold the values the controls will use. These are dependency properties in order to take advantage of all the WPF goodness like data binding and animation. Let’s also add standard .Net property wrappers.


public partial class NumericEntryControl : UserControl
{
    public static readonly DependencyProperty ValueProperty = 
        DependencyProperty.Register("Value",
            typeof(Int32), typeof(NumericEntryControl),
            new PropertyMetadata(0));
 
    public static readonly DependencyProperty MaxValueProperty = 
        DependencyProperty.Register("MaxValue",
            typeof(Int32), typeof(NumericEntryControl),
            new PropertyMetadata(100));
 
    public static readonly DependencyProperty MinValueProperty = 
        DependencyProperty.Register("MinValue",
            typeof(Int32), typeof(NumericEntryControl),
            new PropertyMetadata(0));
 
    public static readonly DependencyProperty IncrementProperty = 
        DependencyProperty.Register("Increment", 
            typeof(Int32), typeof(NumericEntryControl),
            new PropertyMetadata(1));
 
    public static readonly DependencyProperty LargeIncrementProperty = 
        DependencyProperty.Register("LargeIncrement",
            typeof(Int32), typeof(NumericEntryControl),
            new PropertyMetadata(5));    
 
    public Int32 Value
    {
        get
        {
            return (Int32)GetValue(ValueProperty);
        }
        set
        {
            SetValue(ValueProperty, value);
        }
    }
    
    public Int32 MaxValue
    {
        get
        {
            return (Int32)GetValue(MaxValueProperty);
        }
        set
        {
            SetValue(MaxValueProperty, value);
        }
    }
    
    public Int32 MinValue
    {
        get
        {
            return (Int32)GetValue(MinValueProperty);
        }
        set
        {
            SetValue(MinValueProperty, value);
        }
    }
    
    public Int32 Increment
    {
        get
        {
            return (Int32)GetValue(IncrementProperty);
        }
        set
        {
            SetValue(IncrementProperty, value);
        }
    }
    
    public Int32 LargeIncrement
    {
        get
        {
            return (Int32)GetValue(LargeIncrementProperty);
        }
        set
        {
            SetValue(LargeIncrementProperty, value);
        }
    }
}


Creating an incrementing TextBox

Add a TextBox inside the <DockPanel> and bind its text to the value we created in our control:

<DockPanel d:LayoutOverrides="Width">
    <TextBox 
        x:Name="_textbox" 
        Margin="2,0" 
        Text="{Binding Value, 
            Mode=TwoWay, 
            RelativeSource={RelativeSource FindAncestor,
                AncestorLevel=1, 
                AncestorType={x:Type my:NumericEntryControl}}, 
            UpdateSourceTrigger=PropertyChanged}" 
        HorizontalAlignment="Stretch" 
        HorizontalContentAlignment="Right" 
        VerticalContentAlignment="Center" />
</DockPanel>

This will create a TextBox that sizes itself with its parent (a feature I wanted, but is not strictly necessary) and  its text will be bound to the Value in our UserControl.

Handling text input

It used to be that you pointed with a mouse and entered text with a keyboard. However, it is common now to enter text with a stylus, gestures, or some future method not invented yet. Thankfully, WPF supports generic text input handling so you don’t have to concern yourself with the specific hardware.


public NumericEntryControl()
{
   InitializeComponent();
 
   _textbox.PreviewTextInput += 
        new TextCompositionEventHandler(_textbox_PreviewTextInput);
}
 
void _textbox_PreviewTextInput(object sender, 
                   TextCompositionEventArgs e)
{
    if (!IsNumericInput(e.Text))
    {
        e.Handled = true;
        return;
    }
}
 
private bool IsNumericInput(string text)
{
    foreach (char c in text)
    {
        if (!char.IsDigit(c))
        {
            return false;
        }
    }
    return true;
}

This prevents anything except numbers from being entered, whether via character recognition or keyboard. It does not, however, prevent the user from pasting non-numeric text into the box. We’ll handle that later.

Validating Text input

It’s problematic to validate and correct user input as they are entering it. For example, if you set the MaxValue to 100, then every time you enter 1000, it jumps to 100, it can be jarring. It’s a similar situation with text pasted into the control. What the NumericUpDown control does is handle these sort of situations when the control loses focus.

To prepare for this, when the control gains focus, we need to save the last valid value so we have something to restore to.

When the control loses focus, we need to first verify that it is a number and if so, clip it to the bounds of our MinValue and MaxValue. If anything fails, set it back to the previous value.


public partial class NumericEntryControl : UserControl
{
    private int _previousValue = 0;
 
    public NumericEntryControl()
    {
        InitializeComponent();
 
        _textbox.PreviewTextInput += 
            new TextCompositionEventHandler(
                _textbox_PreviewTextInput);
        _textbox.GotFocus += 
            new RoutedEventHandler(_textbox_GotFocus);
        _textbox.LostFocus += 
            new RoutedEventHandler(_textbox_LostFocus);
    }
 
    void _textbox_GotFocus(object sender, RoutedEventArgs e)
    {
        _previousValue = Value;
    }
 
    void _textbox_LostFocus(object sender, RoutedEventArgs e)
    {
        int newValue = 0;
        if (Int32.TryParse(_textbox.Text, out newValue))
        {
            if (newValue > MaxValue)
            {
                newValue = MaxValue;
            }
            else if (newValue < MinValue)
            {
                newValue = MinValue;
            }                
        }
        else
        {
            newValue = _previousValue;
        }
        _textbox.Text = newValue.ToString();
    }
}

Handle arrow keys

Just because WPF can handle text input from a variety of sources in a hardware-agnostic way doesn’t mean we should ignore the particular strengths of the keyboard. Specifically, we should handle the up and down arrows.


public NumericEntryControl()
{
    ...
    _textbox.PreviewKeyDown += 
        new KeyEventHandler(_textbox_PreviewKeyDown);
}
 
void _textbox_PreviewKeyDown(object sender, KeyEventArgs e)
{
    switch (e.Key)
    {
        case Key.Up:
            IncrementValue();
            break;
        case Key.Down:
            DecrementValue();
            break;
        case Key.PageUp:
            Value = Math.Min(Value + LargeIncrement, MaxValue);
            break;
        case Key.PageDown:
            Value = Math.Max(Value - LargeIncrement, MinValue);
            break;
        default:
            //do nothing
            break;
    }
}
 
private void IncrementValue()
{
    Value = Math.Min(Value + Increment, MaxValue);
}
 
private void DecrementValue()
{
    Value = Math.Max(Value - Increment, MinValue);
}

IncrementValue() and DecrementValue() are pulled out as their own method because they’re used in the button-handling code as well (see below).

The code so far is a perfectly usable textbox that accepts only numbers and can be incremented using the keyboard. Typically, however, we also need to support the mouse, and for that we need buttons (unless you want to do something exotic like programs like Photoshop and Lightroom do, where text boxes have support for incrementing gestures—that’s another article).

A button you can hold down

Adding buttons to increment once per click is pretty easy, but we really want to be able to hold down the buttons and have the TextBox increment. Let’s start by adding the XAML for the buttons:


<UserControl 
    x:Class="NumericEntryDemo.NumericEntryControl"
    xmlns="http://schemas.microsoft.com/winfx/2006/xaml/presentation"
    xmlns:x="http://schemas.microsoft.com/winfx/2006/xaml"
    xmlns:mc="http://schemas.openxmlformats.org/markup-compatibility/2006" 
    xmlns:d="http://schemas.microsoft.com/expression/blend/2008" 
    mc:Ignorable="d"
    xmlns:my="clr-namespace:NumericEntryDemo" 
    Width="200" Height="26"
    >
    <DockPanel d:LayoutOverrides="Width">
        <Button x:Name="buttonDecrement" 
                DockPanel.Dock="Left"
                Content="-" 
                Width="{Binding ActualHeight, 
                    ElementName=buttonDecrement, Mode=Default}" 
                Height="{Binding ActualHeight, 
                    ElementName=_textbox, Mode=Default}"/>
        <Button x:Name="buttonIncrement" 
                DockPanel.Dock="Right" 
                Content="+" 
                Width="{Binding ActualHeight, 
                    ElementName=buttonDecrement, Mode=Default}" 
                Height="{Binding ActualHeight, 
                    ElementName=_textbox, Mode=Default}"/>
        <TextBox 
            x:Name="_textbox" 
            Margin="2,0" 
            Text="{Binding Value, 
                Mode=TwoWay, 
                RelativeSource={RelativeSource FindAncestor,
                    AncestorLevel=1, 
                    AncestorType={x:Type my:NumericEntryControl}}, 
                UpdateSourceTrigger=PropertyChanged}" 
            HorizontalAlignment="Stretch" 
            HorizontalContentAlignment="Right" 
            VerticalContentAlignment="Center" />
    </DockPanel>
</UserControl>

Note that the button Width property is  bound to its own ActualHeight property, and the Height property is bound to the TextBox’s ActualHeight. This has the effect of keeping the buttons square, the same height as the TextBox. It’s an effect I wanted, but you can easily dispose of it. With these buttons, our control finally takes shape:

image

How fast should we increment?

Before writing the code to do the incrementing as we hold the button down, it’s worth considering how fast the incrementing should occur. Ideally, we would want it to increment at about the same rate as if we were holding down the up key on the keyboard. The keyboard repeat rate is an operating system value that we can retrieve.

There are actually two values:

private static int _delayRate = 
    System.Windows.SystemParameters.KeyboardDelay;
private static int _repeatSpeed = 
    Math.Max(1, System.Windows.SystemParameters.KeyboardSpeed);

The delay rate is how long we should wait before starting the repetition, and is given in multiples of 250ms. Roughly speaking, humans can determine and control actions with lengths of time of about 200ms, so 250ms is a good value to start with. Any shorter and the repetition might start when it was not intended (say, if they just click the button instead of holding it down).

The keyboard speed is the number of times per second we should repeat—sort of. The value can be 0, so because of the way I use it below I want to sure it’s at least 1.

To allow us to hold the button down, we need to override the default mouse handling of a button which is to disable the standard LeftMouseButtonDown/Up messages. Instead, we need to handle the PreviewMouseLeftButtonDown message and its corresponding Up message.

When we handle the down message, we need to set a timer for the keyboard delay value. When we handle the timer’s tick, we need to increment (or decrement) and change the timer’s interval to the repeat speed. This repeat speed is calculated merely by dividing 1000ms (1s) by the rate per second. There may be better ways, but this gets pretty close to the rate experienced by the keyboard on my computer. Finally, when the mouse button is released we need to stop the timer. We also do a final increment, which will cover the case where the user clicks instead of holds.

We also need to capture the mouse in case the user moves it off the button—otherwise the timer will just keep incrementing forever.

Here’s the code:


private DispatcherTimer _timer = 
    new DispatcherTimer();
private static int _delayRate = 
    System.Windows.SystemParameters.KeyboardDelay;
private static int _repeatSpeed = 
    Math.Max(1, System.Windows.SystemParameters.KeyboardSpeed);
 
private bool _isIncrementing = false;
 
public NumericEntryControl()
{
    ...
 
    buttonIncrement.PreviewMouseLeftButtonDown += 
        new MouseButtonEventHandler(
            buttonIncrement_PreviewMouseLeftButtonDown);
    buttonIncrement.PreviewMouseLeftButtonUp += 
        new MouseButtonEventHandler(
            buttonIncrement_PreviewMouseLeftButtonUp);
 
    buttonDecrement.PreviewMouseLeftButtonDown += 
        new MouseButtonEventHandler(
            buttonDecrement_PreviewMouseLeftButtonDown);
    buttonDecrement.PreviewMouseLeftButtonUp += 
        new MouseButtonEventHandler(
            buttonDecrement_PreviewMouseLeftButtonUp);
 
    _timer.Tick += new EventHandler(_timer_Tick);
}
 
void buttonIncrement_PreviewMouseLeftButtonDown(
    object sender, MouseButtonEventArgs e)
{
    buttonIncrement.CaptureMouse();
    _timer.Interval = 
        TimeSpan.FromMilliseconds(_delayRate * 250);
    _timer.Start();
 
    _isIncrementing = true;
}
 
void buttonIncrement_PreviewMouseLeftButtonUp(
    object sender, MouseButtonEventArgs e)
{
    _timer.Stop();
    buttonIncrement.ReleaseMouseCapture();
    IncrementValue();
}
 
void buttonDecrement_PreviewMouseLeftButtonDown(
    object sender, MouseButtonEventArgs e)
{
    buttonDecrement.CaptureMouse();
    _timer.Interval = 
        TimeSpan.FromMilliseconds(_delayRate * 250);
    _timer.Start();
 
    _isIncrementing = false;
}
 
void buttonDecrement_PreviewMouseLeftButtonUp(
    object sender, MouseButtonEventArgs e)
{
    _timer.Stop();
    buttonDecrement.ReleaseMouseCapture();
    DecrementValue();
}
 
void _timer_Tick(object sender, EventArgs e)
{
    if (_isIncrementing)
    {
        IncrementValue();
    }
    else
    {
        DecrementValue();
    }
    _timer.Interval = 
        TimeSpan.FromMilliseconds(1000.0 / _repeatSpeed);
}

And voila! A NumericEntryControl that’s basic and easy-to-use for both keyboard and mouse.

Further improvements

This isn’t the last word in numeric entry controls, by any means. There are many ways to accomplish it, and this is one that worked well for me. There are a number of further enhancements you could do (and perhaps should do):

  • More validation
  • Ensure that MaxValue >= MinValue
  • Set focus to the TextBox when the control gains focus (maybe)
  • Define strokes to increment and decrement with a stylus
  • The user can change the keyboard repeat rate through Control Panel. This program could be modified to listen for updates to this value.

There’s also another, really cool feature that I will add to this in a future post.

Download full source.

Found this article helpful? Want a resource of hundreds of similar, how-to tips? I’ve written a book that covers topics like this and more in C# 4. Check out C# 4.0 How-To!
Updated CPU usage article

I made a important changes to the CPU usage code and have updated the article to reflect it. Instead of a critical section, the code uses just the interlocked increment/decrement functions. I also updated the sample demo to use multiple threads to read the CPU usage to demonstrate the thread safety clearly.

Determine CPU usage of current process (C++ and C#)

Like this? Please check out my latest book, Writing High-Performance .NET Code.

Updated 2/4/2009: I changed the implementation of these classes from the original:

  • Instead of a critical section, InterlockedIncrement/Decrement is used.
  • The sample driver program now demos using multiple threads using the CpuUsage class to show thread safety.

Download the C++ and C# projects that accompany this article.

Just to make it clear, there is no API called GetProcessCpuPercentage(). To find out the percentage, we can use some other, real APIs and do some calculations. Before getting to the equation and code, let’s discuss the different types of time available.

There are four types of time:

  1. Wall time – The actual, real-world progression of time as measured by you on your watch.
  2. Kernel time – The amount of time spent in kernel mode (protected, high-order mode of operation)
  3. User time – the amount of time spent in user-mode (often by the process itself)
  4. Idle time – nothing going on at all

Kernel, User, and Idle sum to total time, which is approximately wall-time.

Each process spends some time in kernel mode and some time in user mode. We just need to compare the time spent by a process to the time spent by all processes on the computer, since the last time we made such a measurement. It is important to note that we do NOT take into account the idle time.

Thus, the equation is

CpuPercentageEquation

There are two APIs that are useful:

The times reported are absolute, so what we are actually interested is in the difference between the current times and those from a previous run.

Armed with this information, we can calculate the CPU usage for the current process (or any arbitrary process, for that matter).

Let’s do it first in C++ to demonstrate usage of the APIs.

CPU Usage Percentage in C++

Here’s the header file:

   1: #pragma once
   2: #include <windows.h>
   3:
   4: class CpuUsage
   5: {
   6: public:
   7:     CpuUsage(void);
   8:
   9:     short  GetUsage();
  10: private:
  11:     ULONGLONG SubtractTimes(const FILETIME& ftA, const FILETIME& ftB);
  12:     bool EnoughTimePassed();
  13:     inline bool IsFirstRun() const { return (m_dwLastRun == 0); }
  14:
  15:     //system total times
  16:     FILETIME m_ftPrevSysKernel;
  17:     FILETIME m_ftPrevSysUser;
  18:
  19:     //process times
  20:     FILETIME m_ftPrevProcKernel;
  21:     FILETIME m_ftPrevProcUser;
  22:
  23:     short m_nCpuUsage;
  24:     ULONGLONG m_dwLastRun;
  25:
  26:     volatile LONG m_lRunCount;
  27: };

The GetUsage() method is where the work occurs. The other methods are to help in the calculations. The critical section run count enables the code to be called in a multi-threaded environment without problems. I also prevent the code from being called more often than every 250ms. Here is the complete implementation:

   1: #include "StdAfx.h"
   2: #include <windows.h>
   3: #include "CpuUsage.h"
   4:
   5: CpuUsage::CpuUsage(void)
   6: :m_nCpuUsage(-1)
   7: ,m_dwLastRun(0)
   8: ,m_lRunCount(0)
   9: {
  10:     ZeroMemory(&m_ftPrevSysKernel, sizeof(FILETIME));
  11:     ZeroMemory(&m_ftPrevSysUser, sizeof(FILETIME));
  12:
  13:     ZeroMemory(&m_ftPrevProcKernel, sizeof(FILETIME));
  14:     ZeroMemory(&m_ftPrevProcUser, sizeof(FILETIME));
  15:
  16: }
  17:
  18:
  19: /**********************************************
  20: * CpuUsage::GetUsage
  21: * returns the percent of the CPU that this process
  22: * has used since the last time the method was called.
  23: * If there is not enough information, -1 is returned.
  24: * If the method is recalled to quickly, the previous value
  25: * is returned.
  26: ***********************************************/
  27: short CpuUsage::GetUsage()
  28: {
  29:     //create a local copy to protect against race conditions in setting the 
  30:     //member variable
  31:     short nCpuCopy = m_nCpuUsage;
  32:     if (::InterlockedIncrement(&m_lRunCount) == 1)
  33:     {
  34:         /*
  35:         If this is called too often, the measurement itself will greatly 
  36:         affect the results.
  37:         */
  38:
  39:         if (!EnoughTimePassed())
  40:         {
  41:             ::InterlockedDecrement(&m_lRunCount);
  42:             return nCpuCopy;
  43:         }
  44:
  45:         FILETIME ftSysIdle, ftSysKernel, ftSysUser;
  46:         FILETIME ftProcCreation, ftProcExit, ftProcKernel, ftProcUser;
  47:
  48:         if (!GetSystemTimes(&ftSysIdle, &ftSysKernel, &ftSysUser) ||
  49:             !GetProcessTimes(GetCurrentProcess(), &ftProcCreation,
  50:                 &ftProcExit, &ftProcKernel, &ftProcUser))
  51:         {
  52:             ::InterlockedDecrement(&m_lRunCount);
  53:             return nCpuCopy;
  54:         }
  55:
  56:         if (!IsFirstRun())
  57:         {
  58:             /*
  59:             CPU usage is calculated by getting the total amount of time 
  60:             the system has operated since the last measurement 
  61:             (made up of kernel + user) and the total
  62:             amount of time the process has run (kernel + user).
  63:             */
  64:             ULONGLONG ftSysKernelDiff =
  65:                 SubtractTimes(ftSysKernel, m_ftPrevSysKernel);
  66:             ULONGLONG ftSysUserDiff =
  67:                 SubtractTimes(ftSysUser, m_ftPrevSysUser);
  68:
  69:             ULONGLONG ftProcKernelDiff =
  70:                 SubtractTimes(ftProcKernel, m_ftPrevProcKernel);
  71:             ULONGLONG ftProcUserDiff =
  72:             SubtractTimes(ftProcUser, m_ftPrevProcUser);
  73:
  74:             ULONGLONG nTotalSys =  ftSysKernelDiff + ftSysUserDiff;
  75:             ULONGLONG nTotalProc = ftProcKernelDiff + ftProcUserDiff;
  76:
  77:             if (nTotalSys > 0)
  78:             {
  79:                 m_nCpuUsage = (short)((100.0 * nTotalProc) / nTotalSys);
  80:             }
  81:         }
  82:
  83:         m_ftPrevSysKernel = ftSysKernel;
  84:         m_ftPrevSysUser = ftSysUser;
  85:         m_ftPrevProcKernel = ftProcKernel;
  86:         m_ftPrevProcUser = ftProcUser;
  87:
  88:         m_dwLastRun = GetTickCount64();
  89:
  90:         nCpuCopy = m_nCpuUsage;
  91:     }
  92:
  93:     ::InterlockedDecrement(&m_lRunCount);
  94:
  95:     return nCpuCopy;
  96: }
  97:
  98: ULONGLONG CpuUsage::SubtractTimes(const FILETIME& ftA, const FILETIME& ftB)
  99: {
 100:     LARGE_INTEGER a, b;
 101:     a.LowPart = ftA.dwLowDateTime;
 102:     a.HighPart = ftA.dwHighDateTime;
 103:
 104:     b.LowPart = ftB.dwLowDateTime;
 105:     b.HighPart = ftB.dwHighDateTime;
 106:
 107:     return a.QuadPart - b.QuadPart;
 108: }
 109:
 110: bool CpuUsage::EnoughTimePassed()
 111: {
 112:     const int minElapsedMS = 250;//milliseconds
 113:
 114:     ULONGLONG dwCurrentTickCount = GetTickCount64();
 115:     return (dwCurrentTickCount - m_dwLastRun) > minElapsedMS;
 116: }

In order to test this, here is a simple program that starts two threads that run an infinite loop, eating the processor. On a dual-core system, this process will take roughly 85-95% of the CPU. I also start two threads to access the usage object and poll the CPU usage in order to demonstrate the thread safety of the object.

   1: // CpuUsageCpp.cpp : Defines the entry point for the console application.
   2: //
   3:
   4: #include "stdafx.h"
   5: #include <windows.h>
   6: #include "CpuUsage.h"
   7:
   8: DWORD WINAPI EatItThreadProc(LPVOID lpParam);
   9: DWORD WINAPI WatchItThreadProc(LPVOID lpParam);
  10:
  11: CpuUsage usage;
  12:
  13: int _tmain(int argc, _TCHAR* argv[])
  14: {
  15:     //start threads to eat the processor
  16:     CreateThread(NULL, 0, EatItThreadProc, NULL, 0, NULL);
  17:     CreateThread(NULL, 0, EatItThreadProc, NULL, 0, NULL);
  18:
  19:     //start threads to watch the processor (to test thread-safety)
  20:     CreateThread(NULL, 0, WatchItThreadProc, NULL, 0, NULL);
  21:     CreateThread(NULL, 0, WatchItThreadProc, NULL, 0, NULL);
  22:
  23:     while (true)
  24:     {
  25:         Sleep(1000);
  26:     }
  27:
  28:     return 0;
  29: }
  30:
  31:
  32: DWORD WINAPI WatchItThreadProc(LPVOID lpParam)
  33: {
  34:     while (true)
  35:     {
  36:         short cpuUsage = usage.GetUsage();
  37:
  38:         printf("Thread id %d: %d%% cpu usage\n", ::GetCurrentThreadId(), cpuUsage);
  39:         Sleep(1000);
  40:     }
  41: }
  42:
  43: DWORD WINAPI EatItThreadProc(LPVOID lpParam)
  44: {
  45:     ULONGLONG accum = 0;
  46:     while (true)
  47:     {
  48:         accum++;
  49:     }
  50:
  51:     printf("%64d\n", accum);
  52: }

C# Version

In C#, The System.Diagnostics.Process can give us the time information for a specific process. However, we still need the Win32 API call for getting the total system times (GetSystemTimes). The Process class reports times in TimeSpans, not FILETIME, so our class is modified accordingly.

   1: using System;using System.Collections.Generic;
   2: using System.Linq;
   3: using System.Text;
   4: using System.Runtime.InteropServices;
   5: using ComTypes = System.Runtime.InteropServices.ComTypes;
   6: using System.Threading;
   7: using System.Diagnostics;
   8:
   9: namespace CpuUsageCs
  10: {
  11:     class CpuUsage
  12:     {
  13:         [DllImport("kernel32.dll", SetLastError = true)]
  14:         static extern bool GetSystemTimes(
  15:                     out ComTypes.FILETIME lpIdleTime,
  16:                     out ComTypes.FILETIME lpKernelTime,
  17:                     out ComTypes.FILETIME lpUserTime
  18:                     );
  19:
  20:         ComTypes.FILETIME _prevSysKernel;
  21:         ComTypes.FILETIME _prevSysUser;
  22:
  23:         TimeSpan _prevProcTotal;
  24:
  25:         Int16 _cpuUsage;
  26:         DateTime _lastRun;
  27:         long _runCount;
  28:
  29:         public CpuUsage()
  30:         {
  31:             _cpuUsage = -1;
  32:             _lastRun = DateTime.MinValue;
  33:             _prevSysUser.dwHighDateTime = _prevSysUser.dwLowDateTime = 0;
  34:             _prevSysKernel.dwHighDateTime = _prevSysKernel.dwLowDateTime = 0;
  35:             _prevProcTotal = TimeSpan.MinValue;
  36:             _runCount = 0;
  37:         }
  38:
  39:         public short GetUsage()
  40:         {
  41:             short cpuCopy = _cpuUsage;
  42:             if (Interlocked.Increment(ref _runCount) == 1)
  43:             {
  44:                 if (!EnoughTimePassed)
  45:                 {
  46:                     Interlocked.Decrement(ref _runCount);
  47:                     return cpuCopy;
  48:                 }
  49:
  50:                 ComTypes.FILETIME sysIdle, sysKernel, sysUser;
  51:                 TimeSpan procTime;
  52:
  53:                 Process process = Process.GetCurrentProcess();
  54:                 procTime = process.TotalProcessorTime;
  55:
  56:                 if (!GetSystemTimes(out sysIdle, out sysKernel, out sysUser))
  57:                 {
  58:                     Interlocked.Decrement(ref _runCount);
  59:                     return cpuCopy;
  60:                 }
  61:
  62:                 if (!IsFirstRun)
  63:                 {
  64:                     UInt64 sysKernelDiff =
  65:                         SubtractTimes(sysKernel, _prevSysKernel);
  66:                     UInt64 sysUserDiff =
  67:                         SubtractTimes(sysUser, _prevSysUser);
  68:
  69:                     UInt64 sysTotal = sysKernelDiff + sysUserDiff;
  70:
  71:                     Int64 procTotal = procTime.Ticks - _prevProcTotal.Ticks;
  72:
  73:                     if (sysTotal > 0)
  74:                     {
  75:                         _cpuUsage = (short)((100.0 * procTotal) / sysTotal);
  76:                     }
  77:                 }
  78:
  79:                 _prevProcTotal = procTime;
  80:                 _prevSysKernel = sysKernel;
  81:                 _prevSysUser = sysUser;
  82:
  83:                 _lastRun = DateTime.Now;
  84:
  85:                 cpuCopy = _cpuUsage;
  86:             }
  87:             Interlocked.Decrement(ref _runCount);
  88:
  89:             return cpuCopy;
  90:
  91:         }
  92:
  93:         private UInt64 SubtractTimes(ComTypes.FILETIME a, ComTypes.FILETIME b)
  94:         {
  95:             UInt64 aInt =
  96:             ((UInt64)(a.dwHighDateTime << 32)) | (UInt64)a.dwLowDateTime;
  97:             UInt64 bInt =
  98:             ((UInt64)(b.dwHighDateTime << 32)) | (UInt64)b.dwLowDateTime;
  99:
 100:             return aInt - bInt;
 101:         }
 102:
 103:         private bool EnoughTimePassed
 104:         {
 105:             get
 106:             {
 107:                 const int minimumElapsedMS = 250;
 108:                 TimeSpan sinceLast = DateTime.Now - _lastRun;
 109:                 return sinceLast.TotalMilliseconds > minimumElapsedMS;
 110:             }
 111:         }
 112:
 113:         private bool IsFirstRun
 114:         {
 115:             get
 116:             {
 117:                 return (_lastRun == DateTime.MinValue);
 118:             }
 119:         }
 120:     }
 121: }

These classes can now be used wherever you need to monitor the CPU usage of a process.

Notice any improvements to be made? Leave a comment.

Download C++ and C# projects

An easy stack layout panel for WinForms

This is a simple, but useful tip. Users of WPF are spoiled. They have all sorts of layout options. Those of us still working in WinForms have FlowLayoutPanel and TableLayoutPanel. That’s it. WPF has those and more.

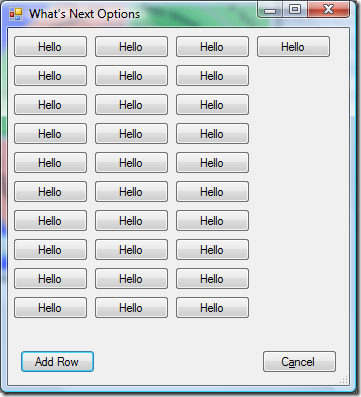
For my current project, I needed a panel to layout controls vertically. The TableLayoutPanel can be awkward to work with, at least for what I need it to. At first glance, the FlowLayoutPanel looks it won’t work, since it produces something like this:

FlowLayoutTable_1

That’s with changing the FlowDirection to TopDown and putting AutoScroll to true.

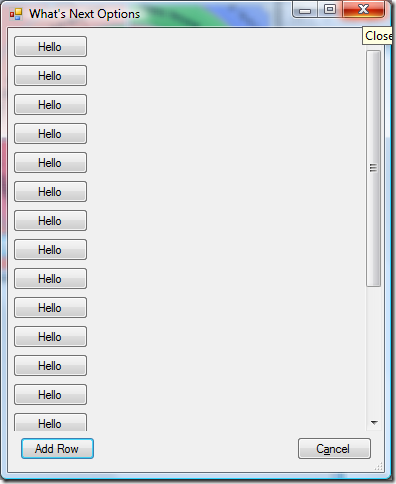
But what I want is this:

image

To achieve this layout, merely set all the following properties on a FlowLayoutPanel:

  • AutoScroll = True
  • FlowDirection = TopDown
  • WrapContents = False

et voilà, Instant stack panel.

Converting OLE_COLOR to System.Drawing.Color

I’ve been working on a project using Visual Studio Tools for Office 2008 (VSTO) and at one point I needed to get the colors for categories in Outlook 2007. There are actually 3 colors, and they are returned as uint’s–why the .Net wrappers don’t convert to colors for you, I don’t know (to avoid linking to System.Drawing?).

The important thing is to convert them into the friendly System.Drawing.Color objects I know and love. For this task, there exists a handy ColorTranslator class. There is a FromOle method that does the exact chore you need. Here’s a sample of my code:


   1: private void GetCategoryColors()
   2: {
   3:     foreach (OutlookLib.Category category in
   4:         Application.ActiveExplorer().Session.Categories)
   5:     {
   6:         CategoryColor color = new CategoryColor(
   7:             ColorTranslator.FromOle((Int32)category.CategoryGradientTopColor),
   8:             ColorTranslator.FromOle((Int32)category.CategoryGradientBottomColor),
   9:             ColorTranslator.FromOle((Int32)category.CategoryBorderColor));
  10:         _categoryCollection[category.Name] = color;
  11:     }
  12: }

Tracking database changes using triggers

Tracking changes in database tables is an incredibly useful feature–especially for operational data that can change often. Having recently had to implement this feature, I thought I’d share some of the techniques I learned.

Sample Database

First, let’s conceptualize a very simple database consisting of user information (name, date of birth), and e-mails. A user can have more than one e-mail.


Table: UserData

Field Type
ID int (PK, identitiy)
FirstName varchar
LastName varchar
birthdate date

Table: UserEmails

Field Type
UserID int (FK)
email varchar


We want to track all changes to the FirstName, LastName, and birthdate fields. In addition we want to track when e-mails are added or removed from a user. As we’ll see, these aims are accomplished using two different methods.

My implementation is done in SQL Server 2000 and C#, but any database that supports triggers can be used.

Changes in a Single Table

With this method we want to track the changes to all fields of a table. In our example, we want to know when FirstName, LastName, and birthdate change values in the UserData table.

To accomplish this we need another table to track the history. This table is going to have the exact same fields as UserData, plus a few extra for the change tracking.

Table: UserDataChanges

Field Type
ChangeID int (PK, identity)
ChangeTime datetime
ChangeUser varchar
ID int (FK)
FirstName varchar
LastName varchar
birthdate date

Now the automated part–adding a trigger to populate this automatically:

CREATE TRIGGER UserDataChangeTrigger ON UserData FOR UPDATE, INSERT
AS    
    IF (UPDATE (FirstName) OR UPDATE(LastName) OR UPDATE(birthdate))    
    BEGIN     
        INSERT UserDataChanges 
            (ChangeTime, ChangeUser, ID, FirstName, LastName, birthdate)
            (SELECT GetUtcDate(), user, ID, FirstName,LastName,birthdate 
                FROM inserted)     
    END     

This trigger will insert a new row into the UserDataChanges table whenever a row in the UserData table is updated or inserted. The IF (UPDATE(FirstName)…. ) is not strictly required in this scenario, but in other cases I did not want a change recorded when certain fields were updated (i.e., you have a field that tracks the last change time of that row, or the number of orders, or any other field that can change frequently and isn’t important to track–you don’t want to create too much noise in this or it will not be useful). The GetUtcDate() and user are SQL Server functions that retrieve the current UTC time and the username of the process that caused the change–very useful for tracking responsibility. The inserted table is created by the server for use by the trigger and contains all the new values.

Changes in a Foreign Key Table

The UserEmails has to be handled differently because there can be multiple e-mails for each user and we can assume they can be added, or removed at will (Remove + Add = Update, so I won’t consider direct updates here).

The solution I landed on was to have a generic event log table that stores manual log entries as well as “special” entries denoting adding or removing e-mails.

Table: UserEventLog

Field Type
EventID int (PK, identity)
ID int (FK)
EventTime datetime
EventType int
ChangeUser varchar
Notes varchar

This table can be used for both adding text notes to a user and, by using the EventType field, special events. In our example, we have two events we need to track:


Event Value
EmailAdded 1
EmailRemoved 2

(In code, I’ve made these enumerations)

Next we add a trigger on the UserEmails table:

CREATE TRIGGER UserEmails_EmailAddedTrigger
ON UserEmails
FOR INSERT
AS
 BEGIN
     INSERT UserEventLog(ID, EventTime, EventType, ChangeUser, Notes)
        (SELECT ID, GetUtcDate(), 1, user, '{'+email+'}' FROM inserted)
 END

The value 1 stands for EmailAdded. I’ve added braces around the actual e-mail address to set it apart from regular notes (we’ll see how to integrate everything later).

To handle the deletion of e-mails add another trigger:

CREATE TRIGGER UserEmails_EmailRemovedTrigger
ON UserEmails
FOR DELETE
AS
 BEGIN
     INSERT UserEventLog(ID, EventTime, EventType, ChangeUser, Notes )
        (SELECT ID, GetUtcDate(), 2, user, '{'+email+'}' FROM deleted)
 END

The only things different: FOR DELETE (instead of INSERT), changed the EventType to 2 (EmailRemoved), and the values are taken from the SQL Server-supplied deleted table.

That’s enough to get a pretty good change-tracking system in place, but you’ll still have to build a UI to display it effectively.

Displaying the Changes in the UI

With the above work done, you end up with two types of entities: changes and events. While it would be possible to integrate all functionality into a single event/change table using a lot more logic in the SQL Trigger code, I’m personally more comfortable with the change logic being in my application code. I think this way the database is kept more “pure” and open to changes down the line.

That means we will need to integrate these two types of entities into a single list, ordered by date/time. I’m going to assume the existence of two classes or structs that represent each of these entities. They’ll be called UserChange and UserEvent. I’ll also assume that the lists of each of these are already sorted by time, since that’s trivial to do in a SQL query.

Given that, we need a function that takes both of these lists and produces a sorted, combined list with an easy-to-understand list.

How the function works:

  1. Go through both lists, and pick whichever one is next, time-wise.
  2. Translate the object into a string/list-view representation of that object.
  3. If it’s a UserChange object, compare it to the previous one to figure out what changed.
  4. Sort the list in reverse order to put newer items at the top.

Here’s the C# code which I’ve adapted from our production system. Don’t get hung up on the details:


private void FillLog(IList<UserEvent> events, IList<UserChange> changes)
{
    List<ListViewItem> tempItems = new List<ListViewItem>();
 
    int currentEventIdx = 0;
    int currentChangeIdx = 0;
    eventLogListView1.Items.Clear();
 
    while (currentEventIdx < events.Count
    || currentChangeIdx < changes.Count)
    {
    UserChange currentChange = null;
    UserChange prevChange = null;
    UserEvent currentEvent = null;
 
    DateTime changeTime = DateTime.MaxValue;
    DateTime eventTime = DateTime.MaxValue;
 
    if (currentChangeIdx < changes.Count)
    {
        currentChange = changes[currentChangeIdx];
        changeTime = currentChange.ChangeDate;
        if (currentChangeIdx > 0)
        {
        prevChange = changes[currentChangeIdx - 1];
        }
 
    }
 
    if (currentEventIdx < events.Count)
    {
        currentEvent = events[currentEventIdx];
        eventTime = currentEvent.EventDate;
    }
    string dateStr;
    string userStr;
    string eventTypeStr="";
    string notesStr;
 
    if (changeTime < eventTime)
    {
        dateStr = Utils.FormatDateTime(changeTime);
        userStr = currentChange.UserName;
        notesStr = GetChangeString(currentChange, prevChange);
        currentChangeIdx++;
    }
    else
    {
        dateStr = Utils.FormatDate(eventTime);
        userStr = currentEvent.UserName;
        notesStr = currentEvent.Notes;
        eventTypeStr = currentEvent.EventType.ToString();
        currentEventIdx++;
    }
 
    if (notesStr.Length > 0)
    {
        ListViewItem item = new ListViewItem(dateStr);
        item.SubItems.Add(userStr);
        item.SubItems.Add(eventTypeStr);
        item.SubItems.Add(notesStr);
        item.ToolTipText = notesStr;
        item.BackColor = (tempItems.Count % 2 == 0) ? 
            Color.Wheat : Color.White;
        tempItems.Add(item);
 
    }
 
    }//end while
    eventLogListView1.BeginUpdate();
    for (int i = tempItems.Count - 1; i >= 0; i--)
    {
    eventLogListView1.Items.Add(tempItems[i]);
    }
 
    eventLogListView1.AutoResizeColumn(0, 
        ColumnHeaderAutoResizeStyle.ColumnContent);
    eventLogListView1.AutoResizeColumn(1, 
        ColumnHeaderAutoResizeStyle.ColumnContent);
    eventLogListView1.AutoResizeColumn(2, 
        ColumnHeaderAutoResizeStyle.ColumnContent);
    eventLogListView1.Columns[3].Width = eventLogListView1.Width - 
    (eventLogListView1.Columns[0].Width +
    eventLogListView1.Columns[1].Width +
    eventLogListView1.Columns[2].Width +10);
 
    eventLogListView1.EndUpdate();
}

Now we need to define GetChangeString, which figures out the differences in successive UserChange objects and displays only pertinent information.


private string GetChangeString(
    BuoyDataChange currentChange, 
    BuoyDataChange prevChange)
{
    StringBuilder sb = new StringBuilder();
 
    if (prevChange == null)
    {
        CompareAndAdd(sb, "First Name", 
            null, currentChange.FirstName);
        CompareAndAdd(sb, "Last Name", 
            null, currentChange.LastName);
        CompareAndAdd(sb, "Birth Date", 
            null, currentChange.BirthDate);
    }
    else
    {
        CompareAndAdd(sb, "First Name", 
            prevChange.FirstName, currentChange.FirstName);
        CompareAndAdd(sb, "Last Name", 
            prevChange.LastName, currentChange.LastName);
        CompareAndAdd(sb, "Birth Date", 
            prevChange.BirthDate, currentChange.BirthDate);
    }
    return sb.ToString();
}

And one last helper function which compares two objects and if different appends the change to a StringBuilder object.


private void CompareAndAdd(StringBuilder sb, string field, 
    object oldVal, object newVal)
   {
       if (oldVal == null && newVal == null)
           return;
 
       if (oldVal == null || !oldVal.Equals(newVal))
       {
           if (sb.Length > 0)
           {
               sb.Append(", ");
           }
           sb.AppendFormat("{0}:{1} -> {2}", field, oldVal, newVal);
       }
   }

In this way you can end up with an automated system that displays all changes in an easy-to-understand format.

Here’s a sample of what our system looks like (click to enlarge):

Change log screenshot

Other ways to accomplish this? Better ways? Please leave a comment!

kick it on DotNetKicks.com

In this universe we obey the law of commutativity

This kind of thing has happened to be a few times now, so I thought I’d share the fun.

In one of our pieces of software we have a process that looks like this:

void MyThread()
{
    while (true)
    {
        DoFunctionA();
        DoFunctionB();
        SleepFor10Seconds();
    }
    
}

While FunctionA and FunctionB are conceptually similar, they interact with completely different systems.

We had a problem with FunctionA the other day–it was taking 120 seconds to do its thing instead of the normal 10 (or less) because a remote server was down. This caused problems for FunctionB because it wasn’t running as often as it should have so things were getting backed up in the system. Oops.

Now, the solution is to split these two functions into two independent threads so they don’t interfere with each other, and I’ve been meaning to do this for a while, so that’s what I proposed.

Response back: “That’s a good idea, but before we do something complicated like that, can we just put FunctionB first?

Um, no.

The time we want to minimize is the time between running FunctionB, which is TimeSleep + TimeA. Putting FunctionB first makes it TimeA + TimeSleep. Last I checked, those were actually equivalent.

GetTextExtent vs. DrawText (with DT_CALCRECT)

Working on an MFC app that has just been converted to Unicode (finally!), I noticed that one button (which is created dynamically) is too small to fit the text in Korean (and Russian and a few other languages).

The code was calling something like:

CSize sz = m_btAdjustColors.GetDC()->GetTextExtent(sCaption);

It seems correct, but these script languages are throwing it for a loop–the measured size is much smaller than it should be. The GetTextExtent documentation doesn’t shed any explicit light on this subject, but may hint at it.

The solution? DrawText. There is a flag you can pass to tell it to calculate the rectangle needed instead of drawing.

CRect rect(0,0,0,0);
m_btAdjustColors.GetDC()->DrawText(sCaption, &rect, DT_CALCRECT);

It’s important to initialize the rectangle to zeroes because, as the docs say, it only modifies the right and bottom members of the rectangle.

How to file good bug reports (from Frank Kelly)

This is an issue I run into constantly at my job.

Frank Kelly wrote up a good summary of some items. They’re simple, easy to understand, easy to follow, even for non-programmers. 😉

In fact, I’m sending this link out to everyone in my group here at work.

Technorati Tags: ,,