Tag Archives: C#

Prefer WeakReference<T> to WeakReference

In Writing High-Performance .NET Code, I mention the WeakReference type briefly in Chapter 2 (Garbage Collection), but I don’t go into it too much. However, for the blog, I want to start a small series of posts going into some more detail about WeakReference, how it works, and when to use it, with some example implementations. In this first post, I’ll just cover what it is, what options there are, and how to use it.

A WeakReference is a reference to an object, but one that still allows the garbage collector to destroy the object and reclaim its memory. This is in contrast to a strong (i.e., normal) reference that does prevent the GC from cleaning up the object.

There are two versions of WeakReference:

First, let’s take a look a WeakReference, which has been around since .NET 1.1.

You allocate a weak reference like this:

var weakRef = new WeakReference(myObj);
myObj = null;

myObj is an existing object of your choice. Once you assign it to the weakRef variable, you should set the original strong reference to null (otherwise, what’s the point?). Now, whenever there is a garbage collection the object weakRef is referring to may be collected. To access this object, you may be tempted to make use WeakReference’s IsAlive property, as in this example:

WeakReference ref1 = new WeakReference(new MyObject());
if (ref1.IsAlive)
{
    // wrong!
    DoSomething(ref1.Target as MyObject);
}

IsAlive is a rather silly property. If it returns false, it’s fine–you know the object has been collected. However, if it returns true, then you don’t actually know anything useful because the object could still be garbage collected before you get a chance to make a strong reference to it!

The correct way to use this is to ignore the IsAlive property completely and just attempt to make a strong reference from Target:

MyObject obj = ref1.Target as MyObject;
if (obj != null)
{
    // correct
    DoSomething(obj);
}

Now there is no race. If obj ends up being non-null, then you’ve got a strong reference that is guaranteed to not be garbage collected (until your own strong reference goes out of scope).

Recognizing some of the silliness and umm…weakness of WeakReference, WeakReference<T> was introduced in .NET 4.5 and it formalizes the above procedure by removing both the Target and IsAlive properties from the class and providing you with these two methods:

  • SetTarget – Set a new target object
  • TryGetTarget – Attempt to retrieve the object and assign it to a strong reference

This example demonstrates the usage, which is essentially the same as the correct way to use WeakReference from above:

WeakReference<MyObject> ref2 = new WeakReference<MyObject>(new MyObject());
MyObject obj2;
if (ref2.TryGetTarget(out obj2))
{
    DoSomething(obj2);
}

You could also ask yourself: Why is there a SetTarget method at all? After all, you could just allocate a new WeakReference<T>.

If you are using WeakReference<T> at all, it likely means you are somewhat memory conscious . In this case, allocating new WeakReference<T> objects will contribute extra, unnecessary memory pressure, potentially worsening the overall performance. Why do this, when you can just reuse the WeakReference<T> object for new targets as needed?

Next time, more details on weak references, particularly the differences between short and long weak references, and taking a peek at them in the debugger. We’ll also cover when you should actually use WeakReference<T> at all.

Part 2, Short vs. Long Weak References and Object Resurrection, is up.

Part 3, Practical Uses, is up.

How To Debug GC Issues Using PerfView

Update: If you find this article useful, you can find a lot more information about garbage collection, debugging, PerfView, and .NET performance in my book Writing High-Performance .NET Code.

In my previous artlcle, I discussed 4 ways to optimize your server application for good garbage collection performance. An essential part of that process is being able to analyze your GC performance to know where to focus your efforts. One of the first tools I always turn to is a little utility that has been publically released by Microsoft.

PerfView Overview

PerfView is a stand-alone, no-install utility that can help you debug CPU and memory problems. It’s so light-weight and non-intrusive that it can be used to diagnose production applications with minimal impact.

I’ve never used it for CPU performance, so I can’t comment on that aspect of it, but that is the primary use for it (which is helpful to keep in mind when trying to grok the “quirky” UI).

PerfView collects data in two ways (as far as memory analysis is concerned):

  1. ETW tracing – This is the heart and soul of PerfView. It’s primarily an event analyzer with advanced grouping abilities to show you only the important things. If you want to know more about ETW, see this series at the ntdebugging blog.
  2. Heap dump – PerfView can dump the heap of your process and apply the same analysis and views that it does for events.

The basic view of the utility is a spreadsheet-like UI with function names and associated inclusive/exclusive costs – just like you would expect to see in a typical CPU profiler. The same paradigm is useful for memory analysis as well.

There are other views that summarize the collected events for you in easy-to-understand reports. We’ll take a quick look at all of this.

In this article, I’ll use PerfView to show you how to see the following:

  • How frequently garbage collections occur and how long they take.
  • The cause for Gen2 collections.
  • The source of large-object allocations.
  • The roots of all the memory in the heap to see who’s holding on to it.
  • A diff of the heap to see what’s changing most frequently.

Test Program

When using a new utility like this, it’s often extremely helpful to create your own test programs with known behavior to ensure that you can use the utility to see what you expect. I’ve created a very simple one, here:

class Program
{
    private static List<int[]> arrays = new List<int[]>();
    private static Random rand = new Random();

    static void Main(string[] args)
    {            
        Console.WriteLine("Press any key to exit...");
        while (!Console.KeyAvailable)
        {
            int size = rand.Next(1024, 100000);
            int[] newArray = new int[size];
            arrays.Add(newArray);
            System.Threading.Thread.Sleep(10);
        }
        Console.WriteLine("Done, exiting");
    }
}

This program “leaks” memory by continually creating arrays and storing them in a list that never gets cleared.

I also make it use server GC, to match what I discussed in the first article.

You can download the sample solution here.

Taking a Trace

When you startup PerfView, you’ll see a window like this:

image

The manual is completely integrated into the program and can be accessed using the links in the menu bar. It’s a fairly dense information dump, but you can learn quite a bit about how to really get the most of out this utility.

First, start the test program and let it run in the background until we’re done taking the trace.

In PerfView, open the Collect menu and select the Collect command. A collection dialog will appear. Don’t change any setting for the moment and just hit Start Collection.You’ll see some status indicating the size and duration of the data collected. Let it go for at least 30 seconds. Note that you don’t specify which process you’re interested in at this stage – PerfView collects events for the machine as a whole.

image

When you’re done click Stop Collection. PerfView will process the collected events for a few seconds or minutes, and then a window will pop up asking you to select a process. Just cancel this (it wants to show you a CPU profile, which we’re not interested in right now) to get back to main screen.

You’ll now see a file show up: PerfViewData.etl (unmerged). Click on the little arrow next to this and you’ll see:

image

From this, we’ll find all the data we’re interested in.

Get GC Stats (pause times and more)

The first place to start is just to get an overall picture of GC performance for your app. There is a view for just that. Double-click the GCStats report, and that will bring up a window with tables for each app. Find MemoryLeak.exe

My test run yields this summary table:

image

Every garbage collection was a generation 2 collection (that’s generally a bad thing), but at least they were fast (to be expected in such a simple program).

Reason for Gen 2 Collection

Gen 2 GCs can happen for two reasons—surviving a gen 1 collection, or allocating on the large object heap. This view will also tell us, further down, which of these is the reason:

image

The collections happened because of large object allocation. You can also see that the second GC happened about 14 seconds after the first, and the next about 32 seconds after that. There are tons of other stats in this view, so look around and see what you can divine about the program’s behavior from this.

Get Source of Large Allocations

From the main PerfView screen, open the GC Heap Alloc Stacks view and find the correct process. This shows you a list of objects which represent the tops of allocation stacks.

image

PerfView has helpfully organized all large-object allocations under the LargeObject entry. Double click this to see all such all allocations:

image

Important: If you see entries like this:

OTHER <<clr?>>

Then right-click on the list and click on Lookup Symbols. Follow the instructions to get the symbol server setup so you can see CLR and Windows function names.

From the above entry view, it’s apparent that the vast majority of large objects are arrays being allocated in Main()—exactly what we expect given our predictable leaky program.

A note on the strange column names: remember how I said this program is designed for CPU profiling? These are typical columns for showing% of CPU time in various parts of a stack, repurposed for memory analysis. Inc % is the percent of bytes allocated on this object compared to all recorded allocations, Inc is the number of bytes allocated, and Inc Ct is the number of objects allocated.

In the above example, this reads: Allocated 6589 arrays for a total of 3.9 GB, accounting for 98% of the memory allocated in the process.

By the way, these are not 100% accurate numbers. There is some sampling going on because of how the events work, but it should be fairly close in most applications.

Who’s Referencing Leaking Memory?

One of the few ways to “leak” memory in C# is to hold onto it unknowingly. By taking a heap dump, we can see the path of object references for who’s holding onto memory.

We’ll need to do a different type of collection. In the main PerfView window. Go to the Memory menu and click Take Heap Snapshot.

image

Find your process and click Dump GC Heap. This performs a live heap walk (that is, the application continues running, so it’s possible the view is slightly inconsistent—not usually an issue), sampling what it finds, and presenting the results in the same type of view as before:

image

Right away you can see that the static variable MemoryLeak.Program.arrays is holding onto 100% of memory in our application. The stack to the root isn’t that interesting in this case because all static variables are rooted directly, but if this were a member field, you would see the hierarchy of objects that are holding onto these references.

Use Two Heap Dumps to see What’s Increasing Fastest

While the test program is still running, take another heap dump, ensuring you save it to a different file. Open both dump views and in the second one, go to the Diff menu and there will be an option to use the other file as a baseline for the diff. This will bring up another window showing you the changes between the two dump files—extremely helpful for narrowing down the most likely areas for leaks.

Important: If you want to analyze the perf trace on a different computer than the one you took it on, you must tell PerfView to merge the file—this will cause all the different files it generated to be combined and symbols reconciled. Just right-click on the ETL file and select Merge. You can also optionally Zip the file (which implies a Merge).

Next Time

Next time, we’ll look at some more drastic measures for protecting yourself against expensive GCs—for when all else fails.

Resources

  • Download the sample test program here.
  • Get PerfView here.

Don’t Log Exception Stacks Unless You Can Afford It

A short, simple tip for this week: Don’t log exception stacks in managed applications unless you understand the performance of your system.

If you have a standard desktop client, or some other app where you can tolerate many-millisecond disruptions or a spike in CPU usage, then you don’t have to care about this.

If you are building a high-performance managed system, then you definitely do have to care about this.

The system I work on needs to handle exceptions coming from 3rd-party components. We can’t let the exceptions kills the process, and we can’t swallow them, ignoring the component failure, so we need to log them. The question is—what information do we log?

For managed exceptions, there are three properties that are most generally useful: type of the exception, Message, and StackTrace.

Getting the type and the Message are nearly free, but accessing StackTrace or calling ToString() on the exception object will cause a bunch of reflection to happen to build up a user-friendly stack trace string. If you can do without, go for it. It may be possible to augment the Message property of an exception to give some clues to the problem. Usually, however, this will not be possible.

Since getting the stack trace for an exception is relatively expensive, especially for a program that shouldn’t miss a beat and needs to continue running, many of the managed applications that I work on have a configuration setting to be able to turn off stack trace logging for exceptions. This enables us to either run it turned on until we see a performance problem, or keep it off until there is a reproable problem, when we can turn it on selectively.

Like this tip? Check out my book, C # 4.0 How-To, where you’ll finds hundreds of great tips like this one.

Performance and Other Issues with System.Enum

I’ve been doing a lot of very intense .Net coding at work for the last few months and it’s very gratifying to see that .Net can handle some pretty serious high-load scalable server work. We are doing some pretty amazing things. However, there are all sorts of gotchas—you do have to learn how to do it correctly (but that’s true of any technology).

One of the things we’re most concerned about right now is performance, and where performance is concerned, one of the big gotchas is the .Net Framework Class Library. Don’t get me wrong, for 99.99% of all .Net projects, the performance is perfectly adequate and you don’t have to care (much). On the other hand, if you’re dealing with highly-scalable systems, you should definitely validate the performance of any general-purpose library you use.

As with all performance question, the only 100% solid advice in all situations is: measure, measure, measure.

General Purpose Methods May Not Be Fast

I did a profiler run on one of our components the other day and a few methods showed up that I would never expect to see in a profiler trace:

We were calling these methods a lot. In my mind, they both basically boiled down to logical AND (&) statements. Unfortunately that’s not the case.

If you use an IL decompiler like ILSpy to examine the code of these methods, you’ll see they do quite a bit more. For example, HasFlag also checks whether the types are equal—useful, but that’s a lot more expensive than a simple & check.

IsDefined is even worse. There are half a dozen checks for specific types, followed by an allocation of an array containing all the enum values, and finally a binary search. If your enums are string types, then it’s just a linear search with string comparisons.

It’s easy to understand why these methods are so heavy—they’re being extra cautious for correctness-sake. That’s probably what you want in a general-purpose framework.

However, if your goal is performance and you have a closed system, complete control of your code, and adequate tests, then you can make better decisions.

Rather than do this:

if (bookFlags.HasFlag(BookTypes.Fiction))

Do this instead:

if ((bookFlags & BookTypes.Fiction) != 0)


As for IsDefined, just don’t use it. Or use it in debug-only assertions to validate functionality.

Another Enum method to avoid if you can is ToString(), especially on enumerations that have [Flags].

HasFlag Gotcha

Suppose you have this code:

[Flags]
enum NodeFlags
{
    Exception = 1,
    Failure = 2,
    Canceled = 4,
    TimedOut = 8,
 
    AnyFailure = Exception | Canceled | TimedOut
}
 
if (node.Flags.HasFlag(NodeFlags.Failure)
    || node.Flags.HasFlag(NodeFlags.TimedOut)
    || node.Flags.HasFlag(NodeFlags.Exception))

You may be tempted to do this:

if (node.Flags.HasFlag(NodeFlags.AnyFailure))

This will not work. It will check that ALL of the bits are set, not just one of them.

You will need to do this:

if ((node.Flags & NodeFlags.AnyFailure) != 0)

We saw that around 5% of our CPU time was being spent just in Enum.IsDefined and Enum.HasFlag. With these changes, we reduce that to approximately 0.

If you find tips like these helpful, you’ll love my book, C# 4.0 How-To.

C# 4.0 How-To Available Now!

Well, it’s finally out! Amazon no longer lists the book as available for pre-sale, and it should be shipping to purchasers today or tomorrow. If you’re a B&N shopper, you can also order it there, or grab it in stores within a few days.

From the product description:

Real Solutions for C# 4.0 Programmers

Need fast, robust, efficient code solutions for Microsoft C# 4.0? This book delivers exactly what you’re looking for. You’ll find more than 200 solutions, best-practice techniques, and tested code samples for everything from classes to exceptions, networking to XML, LINQ to Silverlight. Completely up-to-date, this book fully reflects major language enhancements introduced with the new C# 4.0 and .NET 4.0. When time is of the essence, turn here first: Get answers you can trust and code you can use, right now!

Beginning with the language essentials and moving on to solving common problems using the .NET Framework, C# 4.0 How-To addresses a wide range of general programming problems and algorithms. Along the way is clear, concise coverage of a broad spectrum of C# techniques that will help developers of all levels become more proficient with C# and the most popular .NET tools.

Fast, Reliable, and Easy to Use!

  • Write more elegant, efficient, and reusable code
  • Take advantage of real-world tips and best-practices advice
  • Create more effective classes, interfaces, and types
  • Master powerful data handling techniques using collections, serialization, databases, and XML
  • Implement more effective user interfaces with both WPF and WinForms
  • Construct Web-based and media-rich applications with ASP.NET and Silverlight
  • Make the most of delegates, events, and anonymous methods
  • Leverage advanced C# features ranging from reflection to asynchronous programming
  • Harness the power of regular expressions
  • Interact effectively with Windows and underlying hardware
  • Master the best reusable patterns for designing complex programs

I’ll be doing a book giveaway at some point as well, once I get my own shipment. Stay tuned!

Get it from Amazon

Get it from Barnes and Noble

A WPF Numeric Entry Control

image When WPF first shipped, there was a noticeable lack of certain controls we’ve become used to in Win32 and WinForms: Calendar, DateTimePicker, and NumericUpDown. WPF 4 adds Calendar and DatePicker, but not anything for numeric entry.

For my solution I wanted something that behaved very similarly to the WinForms NumericUpdown control.

Some of the specifications:

  1. Allows user to set Value, MaxValue, MinValue, Increment, and LargeIncrement.
  2. Text directly entered is limited to numbers
  3. Pasted text is not intercepted, but when the control has lost focus it will be validated and reset to the previous value if necessary
  4. Two buttons, for increment and decrement
  5. Holding down the buttons with the mouse causes the number to increment continuously
  6. Up and down increment and decrement by Interval
  7. Page Up and Page Down increment and decrement by LargeInterval
  8. This version only supports integers

Creating the control

To begin, create a new WPF project and add a new User Control called NumericEntryControl. This will create a pair of .cs and .xaml files.

In the XAML file, change the <Grid> root element to be a <DockPanel>.


<UserControl 
    x:Class="NumericEntryDemo.NumericEntryControl"
    xmlns="http://schemas.microsoft.com/winfx/2006/xaml/presentation"
    xmlns:x="http://schemas.microsoft.com/winfx/2006/xaml"
    xmlns:mc="http://schemas.openxmlformats.org/markup-compatibility/2006" 
    xmlns:d="http://schemas.microsoft.com/expression/blend/2008" 
    mc:Ignorable="d"
    xmlns:my="clr-namespace:NumericEntryDemo" Width="200" Height="26">
 
    <DockPanel>
    </DockPanel>
</UserControl>

Before we add the controls, let’s add some properties to our user control to hold the values the controls will use. These are dependency properties in order to take advantage of all the WPF goodness like data binding and animation. Let’s also add standard .Net property wrappers.


public partial class NumericEntryControl : UserControl
{
    public static readonly DependencyProperty ValueProperty = 
        DependencyProperty.Register("Value",
            typeof(Int32), typeof(NumericEntryControl),
            new PropertyMetadata(0));
 
    public static readonly DependencyProperty MaxValueProperty = 
        DependencyProperty.Register("MaxValue",
            typeof(Int32), typeof(NumericEntryControl),
            new PropertyMetadata(100));
 
    public static readonly DependencyProperty MinValueProperty = 
        DependencyProperty.Register("MinValue",
            typeof(Int32), typeof(NumericEntryControl),
            new PropertyMetadata(0));
 
    public static readonly DependencyProperty IncrementProperty = 
        DependencyProperty.Register("Increment", 
            typeof(Int32), typeof(NumericEntryControl),
            new PropertyMetadata(1));
 
    public static readonly DependencyProperty LargeIncrementProperty = 
        DependencyProperty.Register("LargeIncrement",
            typeof(Int32), typeof(NumericEntryControl),
            new PropertyMetadata(5));    
 
    public Int32 Value
    {
        get
        {
            return (Int32)GetValue(ValueProperty);
        }
        set
        {
            SetValue(ValueProperty, value);
        }
    }
    
    public Int32 MaxValue
    {
        get
        {
            return (Int32)GetValue(MaxValueProperty);
        }
        set
        {
            SetValue(MaxValueProperty, value);
        }
    }
    
    public Int32 MinValue
    {
        get
        {
            return (Int32)GetValue(MinValueProperty);
        }
        set
        {
            SetValue(MinValueProperty, value);
        }
    }
    
    public Int32 Increment
    {
        get
        {
            return (Int32)GetValue(IncrementProperty);
        }
        set
        {
            SetValue(IncrementProperty, value);
        }
    }
    
    public Int32 LargeIncrement
    {
        get
        {
            return (Int32)GetValue(LargeIncrementProperty);
        }
        set
        {
            SetValue(LargeIncrementProperty, value);
        }
    }
}


Creating an incrementing TextBox

Add a TextBox inside the <DockPanel> and bind its text to the value we created in our control:

<DockPanel d:LayoutOverrides="Width">
    <TextBox 
        x:Name="_textbox" 
        Margin="2,0" 
        Text="{Binding Value, 
            Mode=TwoWay, 
            RelativeSource={RelativeSource FindAncestor,
                AncestorLevel=1, 
                AncestorType={x:Type my:NumericEntryControl}}, 
            UpdateSourceTrigger=PropertyChanged}" 
        HorizontalAlignment="Stretch" 
        HorizontalContentAlignment="Right" 
        VerticalContentAlignment="Center" />
</DockPanel>

This will create a TextBox that sizes itself with its parent (a feature I wanted, but is not strictly necessary) and  its text will be bound to the Value in our UserControl.

Handling text input

It used to be that you pointed with a mouse and entered text with a keyboard. However, it is common now to enter text with a stylus, gestures, or some future method not invented yet. Thankfully, WPF supports generic text input handling so you don’t have to concern yourself with the specific hardware.


public NumericEntryControl()
{
   InitializeComponent();
 
   _textbox.PreviewTextInput += 
        new TextCompositionEventHandler(_textbox_PreviewTextInput);
}
 
void _textbox_PreviewTextInput(object sender, 
                   TextCompositionEventArgs e)
{
    if (!IsNumericInput(e.Text))
    {
        e.Handled = true;
        return;
    }
}
 
private bool IsNumericInput(string text)
{
    foreach (char c in text)
    {
        if (!char.IsDigit(c))
        {
            return false;
        }
    }
    return true;
}

This prevents anything except numbers from being entered, whether via character recognition or keyboard. It does not, however, prevent the user from pasting non-numeric text into the box. We’ll handle that later.

Validating Text input

It’s problematic to validate and correct user input as they are entering it. For example, if you set the MaxValue to 100, then every time you enter 1000, it jumps to 100, it can be jarring. It’s a similar situation with text pasted into the control. What the NumericUpDown control does is handle these sort of situations when the control loses focus.

To prepare for this, when the control gains focus, we need to save the last valid value so we have something to restore to.

When the control loses focus, we need to first verify that it is a number and if so, clip it to the bounds of our MinValue and MaxValue. If anything fails, set it back to the previous value.


public partial class NumericEntryControl : UserControl
{
    private int _previousValue = 0;
 
    public NumericEntryControl()
    {
        InitializeComponent();
 
        _textbox.PreviewTextInput += 
            new TextCompositionEventHandler(
                _textbox_PreviewTextInput);
        _textbox.GotFocus += 
            new RoutedEventHandler(_textbox_GotFocus);
        _textbox.LostFocus += 
            new RoutedEventHandler(_textbox_LostFocus);
    }
 
    void _textbox_GotFocus(object sender, RoutedEventArgs e)
    {
        _previousValue = Value;
    }
 
    void _textbox_LostFocus(object sender, RoutedEventArgs e)
    {
        int newValue = 0;
        if (Int32.TryParse(_textbox.Text, out newValue))
        {
            if (newValue > MaxValue)
            {
                newValue = MaxValue;
            }
            else if (newValue < MinValue)
            {
                newValue = MinValue;
            }                
        }
        else
        {
            newValue = _previousValue;
        }
        _textbox.Text = newValue.ToString();
    }
}

Handle arrow keys

Just because WPF can handle text input from a variety of sources in a hardware-agnostic way doesn’t mean we should ignore the particular strengths of the keyboard. Specifically, we should handle the up and down arrows.


public NumericEntryControl()
{
    ...
    _textbox.PreviewKeyDown += 
        new KeyEventHandler(_textbox_PreviewKeyDown);
}
 
void _textbox_PreviewKeyDown(object sender, KeyEventArgs e)
{
    switch (e.Key)
    {
        case Key.Up:
            IncrementValue();
            break;
        case Key.Down:
            DecrementValue();
            break;
        case Key.PageUp:
            Value = Math.Min(Value + LargeIncrement, MaxValue);
            break;
        case Key.PageDown:
            Value = Math.Max(Value - LargeIncrement, MinValue);
            break;
        default:
            //do nothing
            break;
    }
}
 
private void IncrementValue()
{
    Value = Math.Min(Value + Increment, MaxValue);
}
 
private void DecrementValue()
{
    Value = Math.Max(Value - Increment, MinValue);
}

IncrementValue() and DecrementValue() are pulled out as their own method because they’re used in the button-handling code as well (see below).

The code so far is a perfectly usable textbox that accepts only numbers and can be incremented using the keyboard. Typically, however, we also need to support the mouse, and for that we need buttons (unless you want to do something exotic like programs like Photoshop and Lightroom do, where text boxes have support for incrementing gestures—that’s another article).

A button you can hold down

Adding buttons to increment once per click is pretty easy, but we really want to be able to hold down the buttons and have the TextBox increment. Let’s start by adding the XAML for the buttons:


<UserControl 
    x:Class="NumericEntryDemo.NumericEntryControl"
    xmlns="http://schemas.microsoft.com/winfx/2006/xaml/presentation"
    xmlns:x="http://schemas.microsoft.com/winfx/2006/xaml"
    xmlns:mc="http://schemas.openxmlformats.org/markup-compatibility/2006" 
    xmlns:d="http://schemas.microsoft.com/expression/blend/2008" 
    mc:Ignorable="d"
    xmlns:my="clr-namespace:NumericEntryDemo" 
    Width="200" Height="26"
    >
    <DockPanel d:LayoutOverrides="Width">
        <Button x:Name="buttonDecrement" 
                DockPanel.Dock="Left"
                Content="-" 
                Width="{Binding ActualHeight, 
                    ElementName=buttonDecrement, Mode=Default}" 
                Height="{Binding ActualHeight, 
                    ElementName=_textbox, Mode=Default}"/>
        <Button x:Name="buttonIncrement" 
                DockPanel.Dock="Right" 
                Content="+" 
                Width="{Binding ActualHeight, 
                    ElementName=buttonDecrement, Mode=Default}" 
                Height="{Binding ActualHeight, 
                    ElementName=_textbox, Mode=Default}"/>
        <TextBox 
            x:Name="_textbox" 
            Margin="2,0" 
            Text="{Binding Value, 
                Mode=TwoWay, 
                RelativeSource={RelativeSource FindAncestor,
                    AncestorLevel=1, 
                    AncestorType={x:Type my:NumericEntryControl}}, 
                UpdateSourceTrigger=PropertyChanged}" 
            HorizontalAlignment="Stretch" 
            HorizontalContentAlignment="Right" 
            VerticalContentAlignment="Center" />
    </DockPanel>
</UserControl>

Note that the button Width property is  bound to its own ActualHeight property, and the Height property is bound to the TextBox’s ActualHeight. This has the effect of keeping the buttons square, the same height as the TextBox. It’s an effect I wanted, but you can easily dispose of it. With these buttons, our control finally takes shape:

image

How fast should we increment?

Before writing the code to do the incrementing as we hold the button down, it’s worth considering how fast the incrementing should occur. Ideally, we would want it to increment at about the same rate as if we were holding down the up key on the keyboard. The keyboard repeat rate is an operating system value that we can retrieve.

There are actually two values:

private static int _delayRate = 
    System.Windows.SystemParameters.KeyboardDelay;
private static int _repeatSpeed = 
    Math.Max(1, System.Windows.SystemParameters.KeyboardSpeed);

The delay rate is how long we should wait before starting the repetition, and is given in multiples of 250ms. Roughly speaking, humans can determine and control actions with lengths of time of about 200ms, so 250ms is a good value to start with. Any shorter and the repetition might start when it was not intended (say, if they just click the button instead of holding it down).

The keyboard speed is the number of times per second we should repeat—sort of. The value can be 0, so because of the way I use it below I want to sure it’s at least 1.

To allow us to hold the button down, we need to override the default mouse handling of a button which is to disable the standard LeftMouseButtonDown/Up messages. Instead, we need to handle the PreviewMouseLeftButtonDown message and its corresponding Up message.

When we handle the down message, we need to set a timer for the keyboard delay value. When we handle the timer’s tick, we need to increment (or decrement) and change the timer’s interval to the repeat speed. This repeat speed is calculated merely by dividing 1000ms (1s) by the rate per second. There may be better ways, but this gets pretty close to the rate experienced by the keyboard on my computer. Finally, when the mouse button is released we need to stop the timer. We also do a final increment, which will cover the case where the user clicks instead of holds.

We also need to capture the mouse in case the user moves it off the button—otherwise the timer will just keep incrementing forever.

Here’s the code:


private DispatcherTimer _timer = 
    new DispatcherTimer();
private static int _delayRate = 
    System.Windows.SystemParameters.KeyboardDelay;
private static int _repeatSpeed = 
    Math.Max(1, System.Windows.SystemParameters.KeyboardSpeed);
 
private bool _isIncrementing = false;
 
public NumericEntryControl()
{
    ...
 
    buttonIncrement.PreviewMouseLeftButtonDown += 
        new MouseButtonEventHandler(
            buttonIncrement_PreviewMouseLeftButtonDown);
    buttonIncrement.PreviewMouseLeftButtonUp += 
        new MouseButtonEventHandler(
            buttonIncrement_PreviewMouseLeftButtonUp);
 
    buttonDecrement.PreviewMouseLeftButtonDown += 
        new MouseButtonEventHandler(
            buttonDecrement_PreviewMouseLeftButtonDown);
    buttonDecrement.PreviewMouseLeftButtonUp += 
        new MouseButtonEventHandler(
            buttonDecrement_PreviewMouseLeftButtonUp);
 
    _timer.Tick += new EventHandler(_timer_Tick);
}
 
void buttonIncrement_PreviewMouseLeftButtonDown(
    object sender, MouseButtonEventArgs e)
{
    buttonIncrement.CaptureMouse();
    _timer.Interval = 
        TimeSpan.FromMilliseconds(_delayRate * 250);
    _timer.Start();
 
    _isIncrementing = true;
}
 
void buttonIncrement_PreviewMouseLeftButtonUp(
    object sender, MouseButtonEventArgs e)
{
    _timer.Stop();
    buttonIncrement.ReleaseMouseCapture();
    IncrementValue();
}
 
void buttonDecrement_PreviewMouseLeftButtonDown(
    object sender, MouseButtonEventArgs e)
{
    buttonDecrement.CaptureMouse();
    _timer.Interval = 
        TimeSpan.FromMilliseconds(_delayRate * 250);
    _timer.Start();
 
    _isIncrementing = false;
}
 
void buttonDecrement_PreviewMouseLeftButtonUp(
    object sender, MouseButtonEventArgs e)
{
    _timer.Stop();
    buttonDecrement.ReleaseMouseCapture();
    DecrementValue();
}
 
void _timer_Tick(object sender, EventArgs e)
{
    if (_isIncrementing)
    {
        IncrementValue();
    }
    else
    {
        DecrementValue();
    }
    _timer.Interval = 
        TimeSpan.FromMilliseconds(1000.0 / _repeatSpeed);
}

And voila! A NumericEntryControl that’s basic and easy-to-use for both keyboard and mouse.

Further improvements

This isn’t the last word in numeric entry controls, by any means. There are many ways to accomplish it, and this is one that worked well for me. There are a number of further enhancements you could do (and perhaps should do):

  • More validation
  • Ensure that MaxValue >= MinValue
  • Set focus to the TextBox when the control gains focus (maybe)
  • Define strokes to increment and decrement with a stylus
  • The user can change the keyboard repeat rate through Control Panel. This program could be modified to listen for updates to this value.

There’s also another, really cool feature that I will add to this in a future post.

Download full source.

Found this article helpful? Want a resource of hundreds of similar, how-to tips? I’ve written a book that covers topics like this and more in C# 4. Check out C# 4.0 How-To!

C# 4.0 How-To now available for pre-sale!

csharp_howto_ben_watson For the last year, aside from starting a great job with Bing, I’ve also been working on a book about C# 4.0 and the upcoming .Net framework. The news: it is finally available for presale! This book is not your typical C# reference. It’s designed to be an easy guide to how to accomplish specific tasks, using a problem/solution approach. Some examples:
  • How to use P/LINQ (new in .Net 4!)
  • Override Equals and implement IEquatable<T> correctly
  • Enforce coding contracts (new in .Net 4!)
  • Convert numbers to strings in arbitrary bases
  • Various ways of rounding, including “snapping” to specific intervals.
  • Dynamic discovery of WCF services
  • Make your Silverlight 3 application run out-of-the-browser
  • Speed up array access
  • Easily split work among multiple processors
  • Localize WinForms, WPF, ASP.Net, and Silverlight apps

…and hundreds of other topics, covering everything from the basics of C# to WPF, ASP.Net, interaction with the operating system, common application patterns and more. I cover all the new stuff that’s in both the C# language and the .Net 4 framework classes, as well as existing functionality.

Each topic begins with a brief description of when/where/why you would need to use the technique, followed by a brief explanation and source code.

I often just want a reference I can quickly dive into to remind me of how something is done. This book is my attempt to put in writing what I find valuable, both when I was learning C# and now when I just need to locate a sample quickly.

Over the next few months I’ll talk more about what’s in the book, and hopefully get back into blogging more programming topics.

An easy stack layout panel for WinForms

This is a simple, but useful tip. Users of WPF are spoiled. They have all sorts of layout options. Those of us still working in WinForms have FlowLayoutPanel and TableLayoutPanel. That’s it. WPF has those and more.

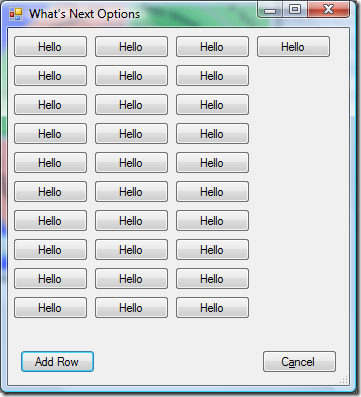
For my current project, I needed a panel to layout controls vertically. The TableLayoutPanel can be awkward to work with, at least for what I need it to. At first glance, the FlowLayoutPanel looks it won’t work, since it produces something like this:

FlowLayoutTable_1

That’s with changing the FlowDirection to TopDown and putting AutoScroll to true.

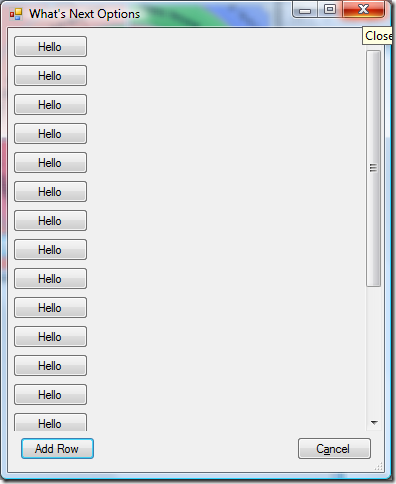
But what I want is this:

image

To achieve this layout, merely set all the following properties on a FlowLayoutPanel:

  • AutoScroll = True
  • FlowDirection = TopDown
  • WrapContents = False

et voilà, Instant stack panel.